Archive for the ‘Collaboration’ Category

Blackboard Mobile Learn

Posted: October 12, 2010 by cunninghamg in Collaboration, Communication, Education

General Thoughts and comments

Blackboard Mobile Learn for iPad

Blackboard Mobile Learn for iPad

[Free] Download from iTunes [Conditions apply*]

The iPad is getting a lot of press coverage that suggests that it will have a significant impact on many University campuses. It is not hard to think where it could be placed in the average student experience. Surfing the web for research, using email for communicating, scheduling classes and assignments using the calendar. The most notable impact that it may have could be in the ebook space. More importantly though , is student interaction with the campus Learning Management System. (LMS). This is the place that all students have daily interaction with their institution, be it accessing course materials, communicating with classmates or submitting assessments. Blackboard is one of the most pervasive learning environments at many institutions and hence has a very significant impact on the student learning experience. It is a natural progression that Blackboard Inc would make a serious commitment to making its platform accessible through mobile devices such as the iPad. Enter Mobile Learn.

Blackboard has released the re-newed capability to access it’s Learning Management system. Having once taken a stab deploying the Blackboard Sync capability to work natively with iPhones, the company has now bolstered it’s commitment to the mobile learning space by releasing Blackboard Mobile Learn. This allows campuses to make its LMS accessible via a number of mobile device platforms. Blackboard Mobile Learn is available on the iPad, iPhone, Blackberry and Android platforms. Symbian to be added later. The iPad app can be downloaded at no cost to students. It does however require your institution to be Mobile Learn enabled. The annual cost of licensing Mobile Learn is not trivial and is based on the size of the institution. This is especially true for International users of Bb Mobile Learn (outside the US). Once the institution is enabled, students can download the app, perform a lookup of the university and subsequently login using the institution’s custom authentication.

Mobile Learn is not meant to fully replicate the capabilities of your University’s LMS. Rather its purpose is to provide agile and supportive access to students for  learning. The application emphasizes the information components of the learning management system but allows interactivity with key tools. The application does cater for faculty to some degree but do not expect to construct or update your course from the application. Maybe in time, integration with other productivity applications such as GoodReader, Docs to Go etc will enable more capability.

As with any new application,  enhancements are likely to follow with user feedback. Blackboard has taken a serious step in enabling a mobile capability for educational institutions in the learning space by introducing Blackboard Mobile Learn. Field testing on a wider scale is likely to benefit Blackboard as a software provider and subsequently users of the software. If a University is not currently enabled, students are likely to drive demand for this capability.

Upsides

  • Allows access to your enrolled course list in Blackboard
  • Provides a dashboard of all activities taking place for new postings of content, announcements etc
  • Allows reading of  content and file attachments, mirrors navigation of web-based structure
  • Allows read access to  course announcements for students; faculty can post announcements
  • Allows reading and replying to discussion board postings
  • Open content and tools persist when switching from course to course
  • Free to download (Institutions need to be licensed/enabled)

Downsides

  • File content is not yet integrated to productivity applications such as GoodReader, DropBox, Docs to Go and others. Assignment submission and attaching documents to discussions could be enhanced by this
  • May not meet the expectations of users who want to do everything on the iPad that can be done on a PC
  • * Universities have to be licensed for staff and student to use the application

More information: Blackboard Mobile Learn

Also available on iPod Touch, iPhone, Android, Blackberry

Moodboard Icon

Moodboard

Price: $8.99 (Lite version is free) – Available through iTunes

Official App Description/Marketing spiel: “ Moodboard is an amazing design tool built exclusively for the iPad that helps designers, decorators, artists, writers, photographers, and other creatives produce better work in less time. There has never been an easier or more enjoyable way to organize the things that inspire you.”

General comments and thoughts:

I found this app quite versatile and useful, especially the ability to jump to the web browser, look for inspirational images and references, crop what I liked, then jump back into moodboard and place it on my “board” with a reference back to the site it was found.

Also love the colour palette builder with the ability to select colours from my images or make my own with the colour wheel.

Adding text is a bit limiting as you are unable to write multiple lines but I have been assured by the developer this will be addressed in their next update. I would also have liked to duplicate my “board” or copy elements from one to another. Hopefully this will be a future update as well.

Ease of Use:

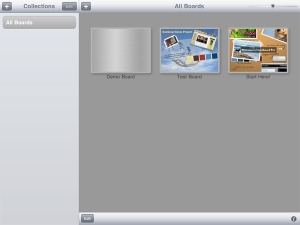
Your first screen is the launch pad for all of your boards. You can also group your boards into collections here which is a very handy tool for organising ideas within projects.

Home page

There are no tutorials with this app but there is a sample Moodboard that has tips and pointers that you can play with, and this is accessible through the home page (see below):

Tutorial moodboard

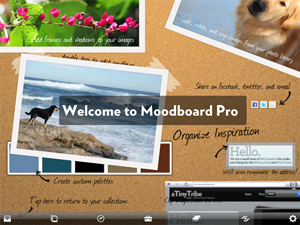
To create a new Moodboard tap the + button in the All Boards section, choose your background (don’t worry, you can change it later), and type your board name then tap “Done”. Your board will open with your background and a tool bar at the bottom of the screen:

Tool bar

Start by building your images and typing your notes etc. Once you have an item on the board you can double tap it to open up editing options.

The menus are pretty intuitive and once you work out to double tap an image to edit it; it’s pretty versatile too. Use the 2 finger pinch method to rotate and resize items and one finger to drag and move things around.

Most graphic and web designers are familiar with the concept of layers and this app uses layers to allow you to order your objects from top-most to bottom. You can also lock your objects so that you don’t inadvertently move them by mistake once positioned correctly. There also seems to be no limit on layers and thus, objects.

I really like the website browser functionality – allowing you to jump between Moodboard and its inbuilt web browser to search for images and inspiration. You have the ability to “capture” the images you like with the crop tool and place them on your Moodboard, and it’s clever enough to remember where the image came from and reference the link if you double tap the image and click on the link icon.

Crop from browser

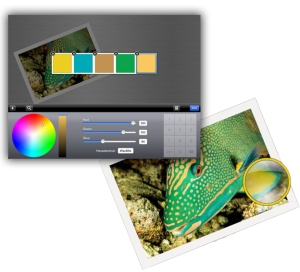
Another great tool is the palette builder which can be found in the Toolbox menu. You can pick colours from a colour wheel or you can click on the magnifying glass and choose colours from your images by passing a circle over them, the edges of the circle displaying the colour selection. You can pick up to 5 colours per strip but add as many strips as you like.

palette picker

Once you have finished adding colours to your palette it appears as a strip on your board. You can double tap any time to edit or check the RGB or hex colour number.

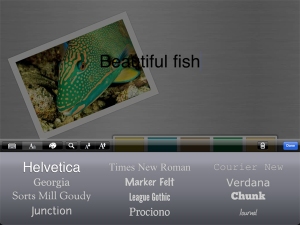
The text editor only allows one line of text which is a bit of a problem but as I mentioned it is being fixed in the next upgrade. There is a limited number of fonts (12 different types) included in the app but it is varied enough for this purpose.

Font choices

When completed you can save your Moodboard to your photo album, email it as a jpeg, or upload it to twitter or facebook, all from the one menu item on the bottom right of the screen.

Pros and Cons:

It can be a bit time consuming to put together your images and move things around, but on the flipside it’s also very easy and is a great tool for rapidly pulling together ideas and for brainstorming with a group, with a wide range of tools and editing options available.

The ability to group your boards into Collections is a very useful feature for organising your projects, styles, items or however you like to organise yourself!

I would like to be able to duplicate boards or items so that you don’t have to start from scratch if you want to modify a board but can keep a copy of the previous one.

As I have mentioned before, the text tool only allowing one line of text at a time is the biggest downfall of the app, and hopefully will be fixed.

Potential uses in Higher Education:

This app would obviously be great for Arts students to put together inspiration and reference for whatever they are involved in. But any student that is working on projects individually or in a group can use this tool to gel their initial ideas.

From a design point of view its useful to go through the process with a client as they can see for themselves how different colour palettes and ideas work with their product. For example, if the client has provided you with some images you could expand on them by adding examples of styles, textures, images and a colour palette, then refining the details with the client before starting the next phase of the project, making sure you are both “on the same page” so to speak.

Overall the ease of use and the speed in which you can pull together ideas is very useful, and though the text tool is a problem, the rest of the functionality of this app is great.

Projector!

Posted: July 27, 2010 by jacquiak in Collaboration, Communication, Productivity
Tags: , , , , , , , ,
Projector for iPad

Projector!

Price: $5.99

App size = 4.3 MB

[Click here to download from iTunes]

Official App Description/Marketing spiel: “Finally! With this amazing app now you CAN project your ideas, documents and pictures to an external display (TV, LCD, Projector.  With a mirrored display, you will exactly know where you are while scrolling up and down the pages. Highlight important points of the document on the big screen using your iPad with the build-in laser pointer. ”

NOTE: The Apple VGA connector is also needed to project on external displays.

General comments and thoughts:

After purchasing the dock converter to VGA adapter from Apple for $39 I have to admit that I was disappointed when I found out that only SOME of the apps on the iPad would display on the big screen.  Although the YouTube app and some Videos will play directly through the VGA cable, and if you have the KeyNote app, this displays too – most other applications, including web browsers do not successfully display.

Big disappointment.

However this app is addressing the problem somewhat in its claims to be able to display the following file types:

  • Adobe PDF
  • Microsoft Word
  • Microsoft PowerPoint
  • Microsoft Excel
  • iWork Pages
  • iWord KeyNote
  • iWork Numbers
  • Text and RTF.

Ease of Use:

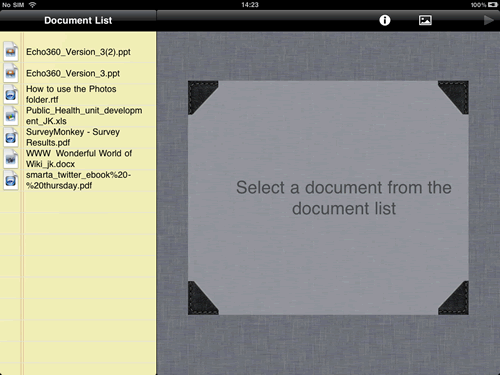
Once you’ve plugged in the VGA cable to your external monitor and opened up Projector app, you are first presented with a blank canvas where you are prompted to open up a file from your Document List.

Start screen of Projector!

This is where I first discovered that you can’t simply and easily browse for a file as such… you have to go to the file you wish to open first and then Open With > Projector.  A bit of a shame, but never mind.  Once you have located the file you wish to open, it automatically adds it to your Document list.

As you can see in the example above I imported a word doc, excel spreadsheet, PDF, PowerPoint file and an RTF. I figured I’d try as many as possible to see if they really COULD play all file types as per their claims!

So, you select the file you want to open from the Document List and a thumbnail preview of the file appears on the canvas.


In the top right hand corner are 3 Project Icons.

The first (Info icon) displays some basic help instructions.

The second (Image icon) allows you to change the background image.

The third (Play icon) is the most important icon, as this lets you move into presentation mode.

Once you select the Play icon your iPad screen will rotate and display your file at the top of the screen. Below this; 4 buttons will appear – left and right buttons to move back and forth through your file. A stop button to stop the presentation. And a switch button which lets you switch between display mode and a magic wand.

Although your iPad screen will look like the above, on the display you are connected too – only the top part (ie your file) will display on-screen.

Pros and Cons:

Although the app claims to be able to show images, I couldn’t find a way to import an image into the Document List.  Having said that, given you can simply display Photos using a VGA cable directly through the Photos app, this isn’t really a big deal anyway.

I also couldn’t get the magic wand tool to work properly (at least not as I was hoping it would work).  When in Presentation mode, if you use your finger to circle an area on the presentation, it doesn’t actually display this on the display screen you’re connected too.  Which makes the tool a little useless.  BUT maybe that was just the TV I was connected too… might have to test this further.

Potential uses in Higher Education:

As a presentation tool for use in a lecture theatre or classroom; the ability to open up this app and quickly display files from your iPad is potentially very useful. Most lecturers these days tend to store their PowerPoint slides or other class documents within their LMS or on a flash drive for convenience. Some take their laptop’s to class and plug them into the projectors.  So this iPad app provides another storage and display alternative, although I think the portability and convenience of a flash drive would still preferable.  Plus it would fit in your pocket 🙂

At the moment what’s missing is the ability to display web pages and to display ANY application installed on the iPad.  If these things are incorporated into the next version of the app (or another app) – it would improve its usability in leaps and bounds.   Mind you, given that Apple controls the approval of apps within iTunes and given their tendency to release a slick product, minus a few vital features (ie releasing the iPhone3G minus a video camera while including a video camera in the iPod nano) it is highly likely that in the future Apple will no doubt incorporate these additional features.  Fingers crossed anyway.