Curtin University has recently implementing the Blackboard Mobile Learn application which will allow students to access their online learning materials via a range of mobile devices, including Android and Blackberry phones and iOS powered devices (iPhone, iPod Touch, iPad).

Read all about it via our newsletter: Issue 21 – Blackboard: isn’t there an app for that?

DropDAV – move your files easily

Posted: April 13, 2011 by Kim Flintoff in Productivity
Tags: ,

This isn’t an iPad app; it is a web based application to allow you to save and move files to and from your iPad and wbetween any web enabled devices.

Web-based Distributed Authoring and Versioning (WebDAV) is a set of methods based on the Hypertext Transfer Protocol (HTTP) that facilitates collaboration between users in editing and managing documents and files stored on World Wide Web servers.”  http://en.wikipedia.org/wiki/WebDAV

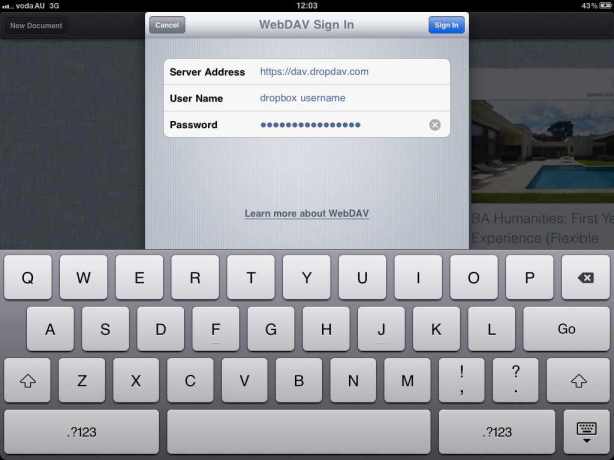
One of the main challenges desktop users encounter when starting to use the cloud and mobile devices is how to get their precious content on and off the device.  Sure, you can use iTunes to add files, but what about working directly from an application?  This is where DropDAV comes into play.  DropDAV effectively lets your application talk directly to DropBox.  Many productivity applications such as Pages, Keynote, etc have webDAV capability.

Price:  Free for upto 2GB if you use the free Dropbox application – upto $6.00 monthly for higher end use.  The website says its free as long as Dropbox remains free.  Desite this assurance DropDAV just notified me today that they are abandoning the free accounts – from here on it costs $5 per month – from my perspective that makes it a premium service not as useful to many users.  Power users will get value – the rest of us just get a new bill…

Enhanced security:  DropDAV uses SSL; providing the same standard of security as your online bank.

It could hardly be simpler to use.

  • Register at DropDAV (simply sign in with your DropBox credentials)
  • Open an appropriate application on your iPad such as Pages and select Copy to WebDAV

Now all you need do is open your iPad application and you can copy to or download from webDAV within the application.  Your files will appear in DropBox and any locations where they are synchronised with DropBox – eg.  between your desktop and your iPad.

Enhanced by Zemanta

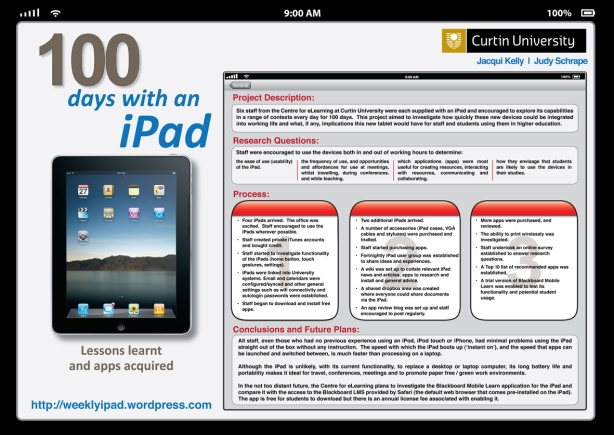
Judy, Dave, Tony and I are soon to be attending the ASCILITE2010 conference in Sydney and we are submitting the following Poster which outlines our research to date with the iPads.  We’ll be displaying it on Day 2 of the conference and you can check out the proceedings version here.

Click on the image below to see a larger version of the actual poster.

Fingers crossed! 🙂


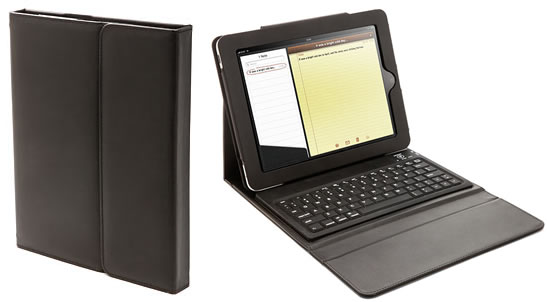
iPad combined bluetooth keyboard and case

Posted: November 19, 2010 by jacquiak in Accessories

When we first purchased our iPads back in May, we invested in the Apple cover/protector for $48 AUD to ensure that the devices were protected and because the case itself allowed you to use the iPad on an angle to allow for easy typing and input. The cases are good, but not great and do attract the dirty easily.

So, last week when Thinkgeek.com advertised a combined blue tooth keyboard and case for$60 USD Judy and I thought we’d splash out and give them a go. Judy mainly because she thought she would use her iPad more with a keyboard attached and me because I am a touch typist and even though the on-screen iPad keyboard is very usable, it doesn’t quite have the same feel as a standard keyboard. So this device seemed like a good option.

(Having said that, my partner Dave did point out that if he’d wanted a keyboard for the iPad, he would have bought a Macbook instead and he may have a point there… but let’s ignore this comment for now  :))

We placed the order and it arrived in under a week. Although the cases themselves did smell like leather glue for awhile, after a few days the smell dissipated and it’s barely noticeable now.

The case comes with a USB connector (to charge the keyboard) and it claims that once charged, the keyboard will run for 90 hours.

To connect the keyboard to your iPad you simply slip the iPad into the case, and once the keyboard is charged, ensure that it is turned ON and click on the Bluetooth Connect icon on the keypad. The bluetooth blue light should come on.

You then simply go to your iPad Settings > General > and turn Bluetooth On. Your iPad should be able to discover your bluetooth keyboard and you simply select the bluetooth keyboard on your iPad. At that point, you’ll be prompted to enter a unique code on your keyboard and once you hit Enter, the device will be paired.

NOTE: Once you have paired the keyboard with your iPad, if you turn off the bluetooth, the connection pairing will be lost and you will need to go into the iPad Settings to pair it again.  At first I found this highly annoying, as I tended to turn off the keyboard whenever I put the iPad away – but since realising this, I have simply left it on continuously.  I may as well find out whether the claims that the keyboard will last 90 hours is actually true!

Ease of Use

I’m currently using the keyboard to draft this review in Pages and I have to admit I really like it.  I expected the keyboard to be one single piece of moulded silicon however the keys are separate, individual pieces of rubber which provide noticeable tactile  feedback.  I do find that when using the iPad with the keyboard,  I keep reaching for a mouse as if I’m using a netbook and then have to remind myself that I have a touch screen device.  It’s also a little odd to be using a word processing app, as whenever I accidentally misspell a word, the suggested word appears in my app – and I still have to touch the screen to select the autocorrect.  So switching between the keyboard and using the touch screen takes a bit of getting used too.

The keyboard also comes with inbuilt function keys: Home, Search, Volume and iPod Controls  which all work seamlessly.

Pros

All in all, a good purchase.  Easy set up, fast delivery and a decent price compared to buying the Apple cover ($48) and Apple blue tooth keypad/dock ($89) – which only allows your iPad to be oriented vertically, whereas this case orientates your iPad in the horizontal position.

Good sized sillicon keyboard which will be useful when avoiding beverage splashes and the leather water resistant appears to be well made and looks very professional.  The case also has a magnetic strip in it to

As mentioned previously it uses a USB connectior to charge the (rechargeable) battery via a computer, so no extra batteries or power are required.

Cons

Once you turn your keyboard off you DO have to pair the devices again once you turn it on.

Plus the case itself is a little heavier and bulkier than the Apple case but it does offer more padded protection, plus you are also now carrying around a fully functional keyboard.

Overall I think buying this case will encourage me to use the iPad more, particularly to take and record notes during meetings, or to jot down ideas at home without having to boot up the desktop computer or laptop.

Nominate your favourite apps

Posted: November 10, 2010 by jacquiak in Uncategorized

In case you haven’t noticed, please vote in our poll to nominate your favourite iPad app.

Quickoffice Connect™ Mobile Suite for iPad

Posted: October 27, 2010 by luckystu in Productivity
Tags:
Quickoffice

Quickoffice

Price: $23.99 – Available through iTunes

Official App Description/Marketing spiel: “ ACCESS. VIEW. EDIT. SHARE. Quickoffice Connect™ Mobile Suite is the FIRST and ONLY full-featured Microsoft® Office productivity suite for iPad with integrated access to multiple cloud services.”

With Quickoffice Connect™ Mobile Suite for iPad you can:

  • Create, open and edit Microsoft® Office files (DOC, DOCX, XLS and XLSX)
  • Access and view PowerPoint files (PPT and PPTX)
  • E-mail, view & access attachments with popular file formats (DOC, DOCX, XLS, XLSX, PPT, PPTX, PDF, iWork, HTML, PNG, JPG, GIF, SVG, TIF, MP3, etc.)
  • Remotely access files via remote storage providers (Box.net, Dropbox, Google Docs and MobileMe)
  • Manage and transfer files via WiFi or via iTunes® using USB
  • Open attachments in Quickoffice from your native iPad® e-mail client

Getting documents into QuickOffice HD is very easy via the usual USB and iTunes sync function; just add your documents and when you sync, they appear in the app. I’ve found, however, that I never use iTunes with the app. Quickoffice has great ad hoc Wi Fi and cloud syncing features which are so easy to use, and so very convenient, that all of my docs end up saved through the cloud. The docs are immediately, and automatically, copied and updated in the cloud folder on my home computer, so version control is not a problem. I use Dropbox for cloud storage, but QuickOffice also supports MobileMe iDisk (both public and private), Google Docs, and Box.net. Just enter your login details and QuickOffice will sync the folders to your iPad, but not the content. The folder content will give a preview but only load when you access the document. Once accessed, it’s stored locally.

iPad email attachments are recognised by Quickoffice, which provides view and save options. Documents saved in Quickoffice on your iPad, or accessed from the cloud via Quickoffice, can be easily deleted using a very nice drag and drop feature. Locally stored docs can be dragged to cloud folders and vice versa. Similarly, documents can be easily emailed by dragging and dropping to an email icon. The downside is that only one document can be emailed at a time. A work around is zipping multiple documents using Good Reader. Perhaps Quickoffice will address this at some point in the future.

Documents are opened with a tap, and are easy to rename. I didn’t like the inclusion of the document file extension within the renaming feature; if I deleted the entire file name, I would have to retype the extension in order for the document to be recognised. Navigation within documents is easy and innovative. Documents can be pinched out to zoom, and you can easily flick through pages. A great navigation feature is the ability to tap and hold on the right side of the screen, which brings up a preview of each page in the document via a Mac OS X dock-style preview with magnification. You can then slide your finger down these preview pages to select the one you want, which is not only stylish but easy to use.

Quickoffice has the usual word processing and spreadsheet tools, including Apple’s cut, copy, and paste. The formatting tools are logically arranged and easy to use. All of the basic formatting options are available including bold, colours, fonts, underline, alignment, formats, etc. There is also a nice built-in saving feature which auto saves your work every minute.

For the spreadsheet application, pinching also zooms and you are given very convenient selection handles for selecting cells.  Although the version I have only allows access and viewing of PowerPoint files (PPT and PPTX), the company website states that a free update is coming soon to create and edit PowerPoint files.

All in all, this is an excellent app for less than $A24.

I’ve been using the ipad for several months now and find it a great asset as a work tool.  I work as a graphic designer for Curtin University.  The most impressive aspects of the iPad is it’s portability, size, light weight and quick start up. It’s great to be able to take the ipad to meetings, show clients visuals of their requested work, gain instant feed back and discuss relating to the job at hand. I’m able to take a screen snap (screen capture) of the visual, place it in my ‘photos’, click and show, or email the visual to myself – open it up in email then show the client. The iPad is small enough to carry anywhere with ease yet large enough to use comfortably from a visual perspective.

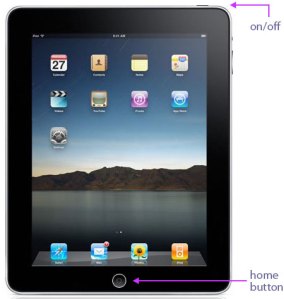
A great feature of the iPad is the screen snap, just hold down the ‘HOME’ button and click the ‘OFF-ON’ button, the screen will turn white for a second so you’ll know the snap has been taken, it will then be stored in your ‘PHOTOS’ for instant access. This is fantastic for info you want to keep a visual  reference of whatever you are viewing on screen, especially for the graphic designer.

I can check work emails outside of work hours if needed or if working from home, use the Web for information or finding images for graphic work. The interface is clean and fresh, with large cute icons. It doesn’t take long to get use to the touch, tap, pinch and wipe controls even if you’re use to using a mouse or WACOM pen. I love the way you’re able to rotate the orientation of the screen, there are no controls allocated to this capability the orientation flips as you tilt or rotate the device giving you maximum screen access. The interface is high res even when zooming in on the screen; they look fantastic.

You’re able to choose your own background image just to add that personal touch to your iPad, when you get tired of looking at your last holiday snap just click and choose a new one.  My kids tend to go into my iPad when I’m not around and surprise me with some new Simpsons character or that holiday snap that you really should have deleted.

For those of you that can’t get through the day without a calender, the iPad presents you with easy day, week or month view. The keyboard is great to use, if you don’t have a problem with typing you’ll find it a breeze, even you two finger typers.

I find the charge life on the iPad quite high, about 1 to 2 days depending on use. Recharging can be done from a USB port on a mac. Sleep mode is great for saving the battery life and quicker than ‘turn-on/turn-off’ with each use.

The lack of folders make it difficult to organise apps in regard to house keeping, however this will all change in November as folders will be a new feature.

The more you use the iPad the more you’ll find!

For more hint, tips and trick on the iPad, you may want to check out these links:

http://gizmodo.com/5508399/10-essential-ipad-tips–tricks

http://www.techradar.com/news/computing/apple/75-really-useful-ipad-tips-and-tricks-688556

http://www.howtogeek.com/howto/14529/the-complete-list-of-ipad-tips-tricks-and-tutorials/

Blackboard Mobile Learn

Posted: October 12, 2010 by cunninghamg in Collaboration, Communication, Education

General Thoughts and comments

Blackboard Mobile Learn for iPad

Blackboard Mobile Learn for iPad

[Free] Download from iTunes [Conditions apply*]

The iPad is getting a lot of press coverage that suggests that it will have a significant impact on many University campuses. It is not hard to think where it could be placed in the average student experience. Surfing the web for research, using email for communicating, scheduling classes and assignments using the calendar. The most notable impact that it may have could be in the ebook space. More importantly though , is student interaction with the campus Learning Management System. (LMS). This is the place that all students have daily interaction with their institution, be it accessing course materials, communicating with classmates or submitting assessments. Blackboard is one of the most pervasive learning environments at many institutions and hence has a very significant impact on the student learning experience. It is a natural progression that Blackboard Inc would make a serious commitment to making its platform accessible through mobile devices such as the iPad. Enter Mobile Learn.

Blackboard has released the re-newed capability to access it’s Learning Management system. Having once taken a stab deploying the Blackboard Sync capability to work natively with iPhones, the company has now bolstered it’s commitment to the mobile learning space by releasing Blackboard Mobile Learn. This allows campuses to make its LMS accessible via a number of mobile device platforms. Blackboard Mobile Learn is available on the iPad, iPhone, Blackberry and Android platforms. Symbian to be added later. The iPad app can be downloaded at no cost to students. It does however require your institution to be Mobile Learn enabled. The annual cost of licensing Mobile Learn is not trivial and is based on the size of the institution. This is especially true for International users of Bb Mobile Learn (outside the US). Once the institution is enabled, students can download the app, perform a lookup of the university and subsequently login using the institution’s custom authentication.

Mobile Learn is not meant to fully replicate the capabilities of your University’s LMS. Rather its purpose is to provide agile and supportive access to students for  learning. The application emphasizes the information components of the learning management system but allows interactivity with key tools. The application does cater for faculty to some degree but do not expect to construct or update your course from the application. Maybe in time, integration with other productivity applications such as GoodReader, Docs to Go etc will enable more capability.

As with any new application,  enhancements are likely to follow with user feedback. Blackboard has taken a serious step in enabling a mobile capability for educational institutions in the learning space by introducing Blackboard Mobile Learn. Field testing on a wider scale is likely to benefit Blackboard as a software provider and subsequently users of the software. If a University is not currently enabled, students are likely to drive demand for this capability.

Upsides

  • Allows access to your enrolled course list in Blackboard
  • Provides a dashboard of all activities taking place for new postings of content, announcements etc
  • Allows reading of  content and file attachments, mirrors navigation of web-based structure
  • Allows read access to  course announcements for students; faculty can post announcements
  • Allows reading and replying to discussion board postings
  • Open content and tools persist when switching from course to course
  • Free to download (Institutions need to be licensed/enabled)

Downsides

  • File content is not yet integrated to productivity applications such as GoodReader, DropBox, Docs to Go and others. Assignment submission and attaching documents to discussions could be enhanced by this
  • May not meet the expectations of users who want to do everything on the iPad that can be done on a PC
  • * Universities have to be licensed for staff and student to use the application

More information: Blackboard Mobile Learn

Also available on iPod Touch, iPhone, Android, Blackberry

Documents to Go

Posted: August 5, 2010 by cunninghamg in Productivity
Tags: , , , , , , , , , , ,

Standard Edition $AUD 12.99 Word, Excel viewing only
Premium Edition $AUD 17.99, email attachment stripping, cloud synchronization, PPT support

standard logo[Click here to download from iTunes] 11 Mb

premium logo[Click here to download from iTunes] 11 Mb

General comments and thoughts

One of the essential tools of any application repertoire on the iPad must be the core productivity apps found on any computer. It is amazing the Office suite, comprising Word ,Excel, Powerpoint has been replicated with a high degree of functionality.

It can be argued that the iPad is not the best environment to be comfortably productive in, however Docs to go goes a long way to bring the most crucial elements of word processing, presentation and spreadsheets. In addition to providing compatibility with common Office file formats, Docs to Go enables viewing of PDFs, SVGs, Gifs and many more. Viewing and basic editing are its main purpose.

I have to say that any application that runs on both the iPad and the iPhone is well worth a look and is likely to be great value for money. Documents to Go competes very well in this space with comparable productivity apps in the same category especially because a single purchase will port to both iPad and iPhone. In addition, the synchronisation options with cloud applications such as Google Docs, MobileMe and Dropbox are a definite plus for any student.

PDF Viewing

PDF document (Click to Enlarge)

Viewing an Excel document

Excel document (Click to Enlarge)

Uses in Higher Education

Documents to Go is ideal for any faculty member or student that has the need to be productive whilst un-chaining themselves from an office or being bound to campus computer labs. I would find that this application’s viewing capability alone will allow any person to go a long way achieving a paperless university experience either in lectures or tutorials or going to grinding faculty meetings! However, the lack of full application functionality does not lend itself to scribing one’s doctoral thesis on.

Overall ? – meets my needs for on the go viewing, editing and document tinkering.

I would certainly go for the Premium edition

Pros

  • Functions on iPad,iPhone,iPod Touch
  • Many basic functions of native applications are available, formatting etc.
  • A complete suite of productivity applications for any student or faculty member
  • Supports a comprehensive list of file types including .docx,.ppt, HTML etc
  • Supports local, desktop and cloud based storage options
  • Email support

Cons

  • Does not completely substitute for the real functionality of native applications
  • Basic edition implies that Powerpoint editing is possible (Icon gives you this impression)
  • Synchronization between iPad and iPhone is not possible
  • Pasting of images into documents not currently supported
Moodboard Icon

Moodboard

Price: $8.99 (Lite version is free) – Available through iTunes

Official App Description/Marketing spiel: “ Moodboard is an amazing design tool built exclusively for the iPad that helps designers, decorators, artists, writers, photographers, and other creatives produce better work in less time. There has never been an easier or more enjoyable way to organize the things that inspire you.”

General comments and thoughts:

I found this app quite versatile and useful, especially the ability to jump to the web browser, look for inspirational images and references, crop what I liked, then jump back into moodboard and place it on my “board” with a reference back to the site it was found.

Also love the colour palette builder with the ability to select colours from my images or make my own with the colour wheel.

Adding text is a bit limiting as you are unable to write multiple lines but I have been assured by the developer this will be addressed in their next update. I would also have liked to duplicate my “board” or copy elements from one to another. Hopefully this will be a future update as well.

Ease of Use:

Your first screen is the launch pad for all of your boards. You can also group your boards into collections here which is a very handy tool for organising ideas within projects.
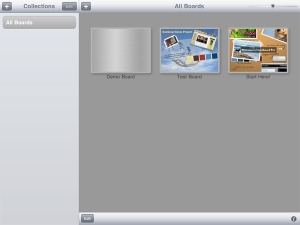
Home page

There are no tutorials with this app but there is a sample Moodboard that has tips and pointers that you can play with, and this is accessible through the home page (see below):
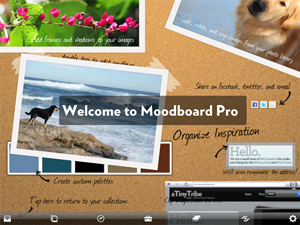
Tutorial moodboard

To create a new Moodboard tap the + button in the All Boards section, choose your background (don’t worry, you can change it later), and type your board name then tap “Done”. Your board will open with your background and a tool bar at the bottom of the screen:

Tool bar

Start by building your images and typing your notes etc. Once you have an item on the board you can double tap it to open up editing options.

The menus are pretty intuitive and once you work out to double tap an image to edit it; it’s pretty versatile too. Use the 2 finger pinch method to rotate and resize items and one finger to drag and move things around.

Most graphic and web designers are familiar with the concept of layers and this app uses layers to allow you to order your objects from top-most to bottom. You can also lock your objects so that you don’t inadvertently move them by mistake once positioned correctly. There also seems to be no limit on layers and thus, objects.

I really like the website browser functionality – allowing you to jump between Moodboard and its inbuilt web browser to search for images and inspiration. You have the ability to “capture” the images you like with the crop tool and place them on your Moodboard, and it’s clever enough to remember where the image came from and reference the link if you double tap the image and click on the link icon.

Crop from browser

Another great tool is the palette builder which can be found in the Toolbox menu. You can pick colours from a colour wheel or you can click on the magnifying glass and choose colours from your images by passing a circle over them, the edges of the circle displaying the colour selection. You can pick up to 5 colours per strip but add as many strips as you like.
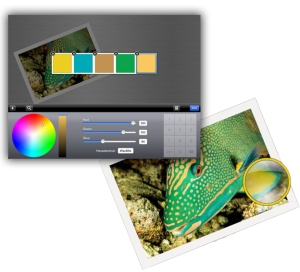
palette picker

Once you have finished adding colours to your palette it appears as a strip on your board. You can double tap any time to edit or check the RGB or hex colour number.

The text editor only allows one line of text which is a bit of a problem but as I mentioned it is being fixed in the next upgrade. There is a limited number of fonts (12 different types) included in the app but it is varied enough for this purpose.

Font choices

When completed you can save your Moodboard to your photo album, email it as a jpeg, or upload it to twitter or facebook, all from the one menu item on the bottom right of the screen.

Pros and Cons:

It can be a bit time consuming to put together your images and move things around, but on the flipside it’s also very easy and is a great tool for rapidly pulling together ideas and for brainstorming with a group, with a wide range of tools and editing options available.

The ability to group your boards into Collections is a very useful feature for organising your projects, styles, items or however you like to organise yourself!

I would like to be able to duplicate boards or items so that you don’t have to start from scratch if you want to modify a board but can keep a copy of the previous one.

As I have mentioned before, the text tool only allowing one line of text at a time is the biggest downfall of the app, and hopefully will be fixed.

Potential uses in Higher Education:

This app would obviously be great for Arts students to put together inspiration and reference for whatever they are involved in. But any student that is working on projects individually or in a group can use this tool to gel their initial ideas.

From a design point of view its useful to go through the process with a client as they can see for themselves how different colour palettes and ideas work with their product. For example, if the client has provided you with some images you could expand on them by adding examples of styles, textures, images and a colour palette, then refining the details with the client before starting the next phase of the project, making sure you are both “on the same page” so to speak.

Overall the ease of use and the speed in which you can pull together ideas is very useful, and though the text tool is a problem, the rest of the functionality of this app is great.